If you purchased your vehicle brand new, it is often recommended to get your transmission serviced typically every two years, or every 30,000 miles. While this is the recommended transmission service interval, the lifespan of transmission fluid can vary depending on use.
By sticking to this recommended 30,000 miles transmission fluid change interval, you can help keep your transmission fluid clean and prevent the fluid from breaking down over time, which it would if you do not get it changed.
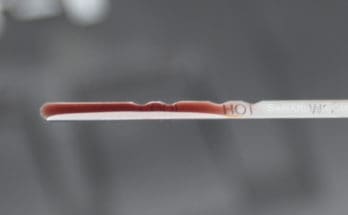
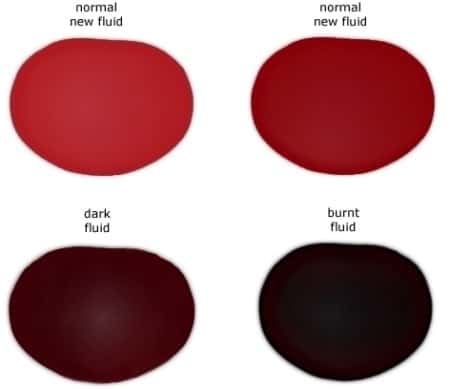
As fluid breaks down, it starts to get burnt. The chart below shows the differences in transmission fluid color as it starts to break down and burn.
When the time comes to get a transmission fluid and / or filter service done, there are essentially two options, which are a fluid flush or fluid change.
When getting your transmission fluid serviced, you may have the option of getting it flushed, or doing what is known as a drain and fill. Both of which you can do yourself if you’re comfortable with basic tools and working under a vehicle.
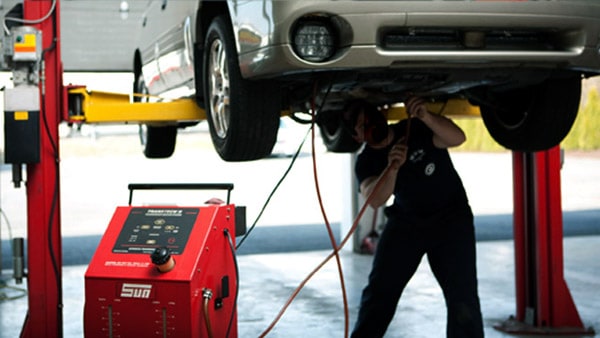
Caution: Use a jack and jackstands or drive on ramps to get under your vehicle safely. If you are unfamiliar with this or do not have the proper equipment, it is highly recommended to take your car to a trusted mechanic to have the service done.
If you are looking to do a basic drain and fill, the biggest factor to consider is does your vehicle have a removable transmission pan or drain plug like a motor.

Many newer vehicles come equipped with transmissions that do not have a pan or drain plug, so these are required to get a flush. However, if your car has a pan or plug, doing a drain and fill is rather straight forward.
When you flush the transmission, all the old, worn out fluid and internal transmission clutch material that comes lose or wears out (this is common) will be pushed out in favor of new, fresh transmission fluid.
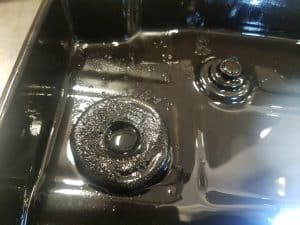
Not only will this help keep your transmission fluid in better condition, but may also remove any debris from the transmission fluid flow path, which may prevent bigger issues down the line. For example, there is a lot of built up sludge material in your transmission that is usually picked up by a magnet in your transmission pan (if applicable), or a built in, non-serviceable filter as shown below.
You can perform the transmission cooler job yourself at home with the right tools, and a little bit of mechanical ability, or you can take your vehicle into a shop to have it performed.
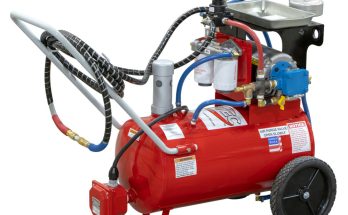
When you do a transmission flush yourself, your transmission’s internal pump is used to flush out the old transmission fluid and to help circulate the new fluid through the system. When you take your vehicle to a shop, in most cases they will use a machine that it specifically designed to push fluid through the system at high pressure to flush out the old fluid while simultaneously adding new fluid.
In the cases where transmission failure has been reported after transmission flushes are done, the biggest issue is that the high pressure flushing machine will dislodge dirt and debris that the transmissions internal pump doesn’t have the power to push out, and some of the larger pieces of debris can then be pushed into other parts of the transmission and get stuck in those often vital transmission parts.
In order to perform a transmission cooler flush yourself, the following instructions will guide you through the proper process
Gather your tools. You will need ten or more quarts of transmission fluid, either a floor jack and stands or ramps, a screwdriver, ratchet, socket set, wheel chocks, a drain pan, long neck funnel, and some shop rags or paper towels.
First, pull the dipstick and check the transmission fluid that is on the stick. If the fluid is dark and smells burnt, you need to perform a fluid and filter change instead of a transmission cooler flush. If the fluid looks and smells normal, you can go ahead with the transmission cooler flush as planned.
Start your engine and allow your vehicle to warm to normal operating temperature, then shut the engine off. Place a wheel chock behind one of the rear tires. Raise a front wheel of the vehicle with the floor jack, then position your jack stands securely under the vehicle. Slowly lower the floor jack until the weight of the vehicle is resting on the jack stands, and the jack stands are stable. If using ramps, simply drive your vehicle onto the ramps.
Locate the 2 transmission cooler lines. These lines run from the transmission or the transaxle to the radiator. One of the lines carries hot automatic transmission fluid from the transmission to the radiator (or called the transmission oil cooler), while the other line carries the cooled fluid back to your transmission.
Disconnect the lower transmission oil cooler line where it enters the radiator. Position the drain pan to catch the fluid that is coming out of this line. From under the hood, pull the transmission dipstick from the fill tube and insert your funnel. Remove all of the caps from the new transmission fluid, as you will be pouring these bottles back to back. As you pour the new fluid in, the old fluid will be pumped out of your transmission by the internal pump into the drain bucket.
Start your engine. Pour in 9 quarts of automatic transmission oil, one directly after another. Remove the funnel. Push the dipstick all the way into place in the tube. Check the fluid level with the dipstick. If it reads low, you can add ⅓ quart of transmission fluid at a time until it shows full on the dipstick. Once it is full, check around under the car for fluid leaks. If no leaks are apparent, go ahead and put the vehicle on the ground, and allow the engine temperature to warm to normal. Once it is warm, apply the brake, and move the gear shifter through the gears, pausing for a few seconds in between shifting to the next gear, then return the vehicle to park.
With the engine still on and idling, pull the dipstick and check the fluid level again. If it still reads full, the job is complete. For more information, check out our guide on how to check transmission fluid levels.
After 15+ years in the automotive industry, I’ve developed strong opinions about transmission cooling — and about the lack of reliable information available to enthusiasts who actually need it.
I’ve built and developed transmission cooler systems across a wide range of applications: street cars, race cars, and trucks. I created this site to put what I know in one place.
If you’re an automotive enthusiast trying to make a smart decision about your transmission and its cooling needs, this is the resource I wish had existed when I was starting out.